Read/Write Splitting of StoneDB
StoneDB 1.0 uses Tianmu to process analytics workloads and InnoDB to process transaction workloads. In this case, to implement read/write splitting, StoneDB must be deployed in an environment where primary/secondary replication is enabled so that all write operations and partial read operations can be routed to InnoDB and all analytics workloads can be routed to Tianmu. Read/write splitting can be achieved by using third-party middleware or at the service frontend. In the example provided in this topic, third-party middleware ProxySQL is used to introduce how to implement read/write splitting.
The following table provides the environment configurations:
| IP Address | Memory | CPU | OS | Role | Database/Middleware |
|---|---|---|---|---|---|
| 192.168.30.40 | 8 GB | 8 cores | CentOS Linux release 7.9 | Primary | MySQL 5.7 |
| 192.168.30.41 | 8 GB | 8 cores | CentOS Linux release 7.9 | N/A | ProxySQL 2.2 |
| 192.168.30.42 | 8 GB | 8 cores | CentOS Linux release 7.9 | Secondary | MySQL 5.7 |
| 192.168.30.46 | 16 GB | 16 cores | CentOS Linux release 7.9 | Secondary | StoneDB 5.7 |
- The configurations of the four servers are consistent, except that the server on which StoneDB is deployed provides larger memory and more CPU cores. This is because StoneDB needs to replay binlogs and process analytical queries. These operations are resource consuming.
- We recommend that the databases deployed on primary and secondary nodes are consistent in version.
The following figure illustrates the architecture:
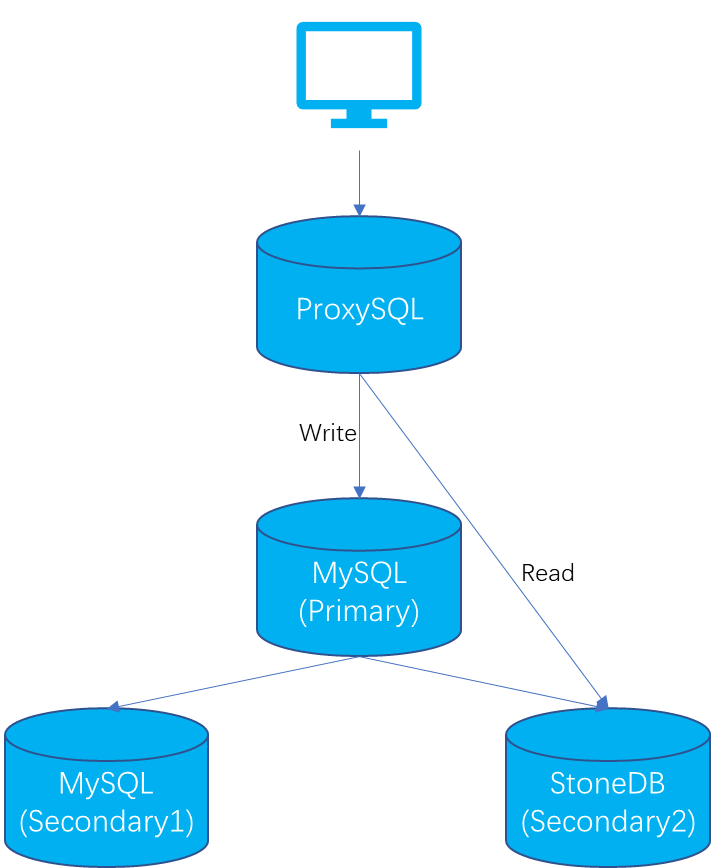
This architecture consists of four nodes, one primary node: two secondary nodes, and one node (192.168.30.41) at the upper layer to deploy ProxySQL.
- In the primary node (192.168.30.40), the InnoDB engine is used to process read and write operations in transactions. The primary node is a read-write node.
- In secondary node 1 (192.168.30.42), the InnoDB engine is used to synchronize data from the primary node. The secondary node is a read-only node. If the primary node fails, services will be automatically switched to secondary node 1 to ensure smooth service running.
- In secondary node 2 (192.168.30.46), the Tianmu engine is used only to process read operations required by analytical queries.
Step 1. Check the system environment
Perform the following sub-steps on each of the four nodes:
1.1 Disable the firewall
# systemctl stop firewalld
# systemctl disable firewalld
1.2 Disable SELinux
# vim /etc/selinux/config
SELINUX = disabled
1.3 Disable swap
Change the value of vm.swappiness to 1 to disable swap.
# vi /etc/sysctl.conf
vm.swappiness = 1
1.4 Modify the limits of the OS
# ulimit -a
core file size          (blocks, -c) 0
data seg size           (kbytes, -d) unlimited
scheduling priority             (-e) 0
file size               (blocks, -f) unlimited
pending signals                 (-i) 1031433
max locked memory       (kbytes, -l) 64
max memory size         (kbytes, -m) unlimited
open files                      (-n) 65535
pipe size            (512 bytes, -p) 8
POSIX message queues     (bytes, -q) 819200
real-time priority              (-r) 0
stack size              (kbytes, -s) 10240
cpu time               (seconds, -t) unlimited
max user processes              (-u) 1024
virtual memory          (kbytes, -v) unlimited
file locks                      (-x) unlimited

# Modify the soft and hard limits of the OS.
# vim /etc/security/limits.conf
* soft nofile 65535
* hard nofile 65535
mysql soft nproc 1028056
mysql hard nproc 1028056
1.5 Create a user
# groupadd mysql
# useradd -g mysql mysql
# passwd mysql
This sub-step is not required for the node on which ProxySQL is deployed. After all the steps are complete on a node, restart the OS of the node.
Step 2. Deploy MySQL
On each of server 192.168.30.40 and server 192.168.30.42, perform the following sub-steps to deploy MySQL.
2.1 Download the installation package
Download the installation package of MySQL 5.7.
2.2 Uninstall MariaDB
# rpm -qa|grep mariadb
mariadb-5.5.56-2.el7.x86_64
mariadb-server-5.5.56-2.el7.x86_64
mariadb-libs-5.5.56-2.el7.x86_64
# yum remove mariadb*
# rpm -qa|grep mariadb
2.3 Upload and decompress the TAR package
# tar -zxvf mysql-5.7.36-linux-glibc2.12-x86_64.tar.gz -C /usr/local/
# cd /usr/local/
# mv mysql-5.7.36-linux-glibc2.12-x86_64 mysql
2.4 Create directories
# mkdir -p /mysql/data/
# mkdir -p /mysql/log
# chown -R mysql:mysql /mysql/
2.5 Configure parameter file my.cnf
On the primary node:
# vim /etc/my.cnf
[client]
port    = 3306
socket  = /mysql/data/mysql.sock

[mysqld]
port      = 3306
basedir   = /usr/local/mysql
datadir   = /mysql/data
socket    = /mysql/data/mysql.sock
pid_file  = /mysql/data/mysqld.pid
log_error = /mysql/log/mysqld.log
log_bin   = /mysql/log/mybinlog
server_id = 40
character_set_server = utf8mb4
collation_server = utf8mb4_general_ci
max_connections = 1000
binlog_format = row
default_storage_engine = innodb
read_only=0

innodb_buffer_pool_size = 4096000000
innodb_log_file_size = 1024000000
innodb_log_files_in_group = 3
innodb_io_capacity = 4000
innodb_io_capacity_max = 8000

# Enabe the GTID mode.
gtid_mode = on
enforce_gtid_consistency = 1

# Parallel replication
binlog_transaction_dependency_tracking = WRITESET
transaction_write_set_extraction = XXHASH64
On the secondary node 1:
# vim /etc/my.cnf
[client]
port    = 3306
socket  = /mysql/data/mysql.sock

[mysqld]
port      = 3306
basedir   = /usr/local/mysql
datadir   = /mysql/data
socket    = /mysql/data/mysql.sock
pid_file  = /mysql/data/mysqld.pid
log_error = /mysql/log/mysqld.log
log_bin   = /mysql/log/mybinlog
server_id = 42
character_set_server = utf8mb4
collation_server = utf8mb4_general_ci
max_connections = 1000
binlog_format = row
default_storage_engine = innodb
read_only=1

innodb_buffer_pool_size = 4096000000
innodb_log_file_size = 1024000000
innodb_log_files_in_group = 3
innodb_io_capacity = 4000
innodb_io_capacity_max = 8000

# Enabe the GTID mode.
gtid_mode = on
enforce_gtid_consistency = 1

# Parallel replication
binlog_transaction_dependency_tracking = WRITESET
transaction_write_set_extraction 6= 4
2.6 Initialize the instance
/usr/local/mysql/bin/mysqld --defaults-file=/etc/my.cnf --initialize --user=mysql
2.7 Start the instance
/usr/local/mysql/bin/mysqld_safe --defaults-file=/etc/my.cnf --user=mysql &
The temporary password of the administrator account is saved in mysqld.log. After the initial login, you must change the password.
Step 3. Deploy StoneDB
3.1 Download the installation package
Download the installation package of StoneDB_5.7.
3.2 Upload and decompress the TAR package
# cd /
# tar -zxvf stonedb-ce-5.7-v1.0.0.el7.x86_64.tar.gz
You can upload the installation package to the server (192.168.30.46) based on the installation instructions. The directory extracted from the installation package is stonedb57. In this example, the installation path is /stonedb57.
3. Check the dependencies
# cd /stonedb57/install/bin
# ldd mysqld
# ldd mysql
If the command output contains keywords not found, some dependencies are missing and must be installed. For example, libsnappy.so.1 => not found is returned.
- If your OS is Ubuntu, run the
sudo apt search libsnappycommand. The command output will inform you to install libsnappy-dev. - If your OS is RHEL or CentOS, run the
yum search all snappycommand. The command output will inform you to install snappy-devel and snappy.
3.4 Create directories
mkdir -p /stonedb57/install/data
mkdir -p /stonedb57/install/binlog
mkdir -p /stonedb57/install/log
mkdir -p /stonedb57/install/tmp
mkdir -p /stonedb57/install/redolog
mkdir -p /stonedb57/install/undolog
chown -R mysql:mysql /stonedb57
3.5 Configure parameter file my.cnf
# vim /stonedb57/install/my.cnf
[client]
port    = 3306
socket  = /stonedb57/install/tmp/mysql.sock

[mysqld]
port      = 3306
basedir   = /stonedb57/install/
datadir   = /stonedb57/install/data
socket    = /stonedb57/install/tmp/mysql.sock
pid_file  = /stonedb57/install/data/mysqld.pid
log_error = /stonedb57/install/log/mysqld.log
log_bin   = /stonedb57/install/binlog/binlog
server_id = 46
character_set_server = utf8mb4
collation_server = utf8mb4_general_ci
max_connections = 1000
binlog_format = row
default_storage_engine = tianmu
read_only=1

innodb_buffer_pool_size = 2048000000
innodb_log_file_size = 1024000000
innodb_log_files_in_group = 3
innodb_io_capacity = 4000
innodb_io_capacity_max = 8000
innodb_log_group_home_dir   = /stonedb57/install/redolog/
innodb_undo_directory       = /stonedb57/install/undolog/
innodb_undo_log_truncate    = 1
innodb_undo_tablespaces     = 3
innodb_undo_logs            = 128

# Enable the GTID mode.
gtid_mode = on
enforce_gtid_consistency = 1

# Parallel replication
slave_parallel_type = LOGICAL_CLOCK
slave_parallel_workers = 8
3.6 Initialize the instance
/stonedb57/install/bin/mysqld --defaults-file=/stonedb57/install/my.cnf --initialize --user=mysql
3.7 Start the instance
/stonedb57/install/bin/mysqld_safe --defaults-file=/stonedb57/install/my.cnf --user=mysql &
The temporary password of the administrator account is saved in mysqld.log. After the initial login, you must change the password.
Step 4. Configure primary/secondary replication
4.1 Create a replication user
create user 'repl'@'%' identified by 'mysql123';
grant replication slave on *.* to 'repl'@'%';
4.2 Back up the primary database
/usr/local/mysql/bin/mysqldump -uroot -pmysql123 --single-transaction --set-gtid-purged=on -B aa > /tmp/aa.sql
4.3 Transfer the backup file
scp /tmp/aa.sql root@192.168.30.42:/tmp
scp /tmp/aa.sql root@192.168.30.43:/tmp
If the backup file is too large, we recommend that you use MyDumper to transfer the file.
4.4 Recover secondary node 1
/usr/local/mysql/bin/mysql -uroot -pmysql123 -S /mysqldb/data/mysql.sock
source /tmp/aa.sql
Before performing this operation, ensure that gtid_executed is empty.
4.5 Recover secondary node 2
Before recovering secondary node 2, change the storage engine from InnoDB to Tianmu and comment out the UNLOCK TABLES and LOCK TABLES statements.
sed -i 's/UNLOCK TABLES/-- UNLOCK TABLES/g' /tmp/aa.sql
sed -i 's/LOCK TABLES `/-- LOCK TABLES `/g' /tmp/aa.sql
sed -i 's/ENGINE=InnoDB/ENGINE=tianmu/g' /tmp/aa.sql

/stonedb57/install/bin/mysql -uroot -pmysql123 -S /stonedb57/install/tmp/mysql.sock
source /tmp/aa.sql
Before performing this operation, ensure that gtid_executed is empty.
4.6 Configure primary/secondary replication
On secondary node 1:
CHANGE MASTER TO
MASTER_HOST='192.168.30.40',
MASTER_PORT=3306,
MASTER_USER='repl',
MASTER_PASSWORD='mysql123',
MASTER_AUTO_POSITION = 1;

start slave;
show slave status\G
On secondary node 2:
CHANGE MASTER TO
MASTER_HOST='192.168.30.40',
MASTER_PORT=3306,
MASTER_USER='repl',
MASTER_PASSWORD='mysql123',
MASTER_AUTO_POSITION = 1;

start slave;
show slave status\G
Step 5. Configure ProxySQL
5.1 Install ProxySQL
# mkdir -p /home/ProxySQL
# cd /home/ProxySQL
# yum install proxysql-2.2.0-1-centos7.x86_64.rpm
# rpm -qa|grep proxysql
# rpm -ql proxysql
File proxysql.cnf is the configuration file of ProxySQL.
5.2 Start ProxySQL
# systemctl start proxysql
# netstat -lntp|grep proxysql
tcp        0      0 0.0.0.0:6032            0.0.0.0:*               LISTEN      17957/proxysql
tcp        0      0 0.0.0.0:6033            0.0.0.0:*               LISTEN      17957/proxysql
Port 6032 is the default port of the admin interface. Port 6033 is used for external access.
5.3 Log in to ProxySQL as an administrator
# mysql -uadmin -padmin -h127.0.0.1 -P6032 --prompt='ProxySQL>'
mysql: [Warning] Using a password on the command line interface can be insecure.
Welcome to the MySQL monitor.  Commands end with ; or \g.
Your MySQL connection id is 1
Server version: 5.5.30 (ProxySQL Admin Module)

Copyright (c) 2000, 2021, Oracle and/or its affiliates.

Oracle is a registered trademark of Oracle Corporation and/or its
affiliates. Other names may be trademarks of their respective
owners.

Type 'help;' or '\h' for help. Type '\c' to clear the current input statement.

ProxySQL>show databases;
+-----+---------------+-------------------------------------+
| seq | name          | file                                |
+-----+---------------+-------------------------------------+
| 0   | main          |                                     |
| 2   | disk          | /var/lib/proxysql/proxysql.db       |
| 3   | stats         |                                     |
| 4   | monitor       |                                     |
| 5   | stats_history | /var/lib/proxysql/proxysql_stats.db |
+-----+---------------+-------------------------------------+
5 rows in set (0.00 sec)
The default username and password of ProxySQL are admin and admin. Parameter prompt is added to make the environment easy to identify.
5.4 Create required accounts
On the primary node, create a monitoring account and an account for external access. The monitoring account needs only the replication client permission.
### Monitoring account
create user 'monitor'@'%' identified by 'MySQL_123';
grant replication client on *.* to 'monitor'@'%';

### Account for external access to ProxySQL
create user 'proxysql'@'%' identified by 'MySQL_123';
grant select,delete,update,insert on *.* to 'proxysql'@'%';
5.5 Configure read and write groups
a. Create groups
Fields writer_hostgroup and reader_hostgroup in table mysql_replication_hostgroups respectively specify the read group ID and the write group ID. Values of the two fields must be larger than 0 and different. In the following example, writer_hostgroup is set to 10 and reader_hostgroup is set to 20.
ProxySQL classifies the primary and secondary nodes into corresponding groups based on the values of read_only. If read_only is 0, the node is the primary node and is classified into the write group. If read_only is 1, the node is a secondary node and is classified into the read group.
### Create groups.
insert into mysql_replication_hostgroups(writer_hostgroup,reader_hostgroup,comment) values(10,20,'proxy');
load mysql servers to runtime;
save mysql servers to disk;

### Check whether data is written to each of the three layers.
ProxySQL>select * from mysql_replication_hostgroups;
+------------------+------------------+------------+---------+
| writer_hostgroup | reader_hostgroup | check_type | comment |
+------------------+------------------+------------+---------+
| 10               | 20               | read_only  | proxy   |
+------------------+------------------+------------+---------+
1 row in set (0.00 sec)

ProxySQL>select * from runtime_mysql_replication_hostgroups;
+------------------+------------------+------------+---------+
| writer_hostgroup | reader_hostgroup | check_type | comment |
+------------------+------------------+------------+---------+
| 10               | 20               | read_only  | proxy   |
+------------------+------------------+------------+---------+
1 row in set (0.00 sec)

ProxySQL>select * from mysql_replication_hostgroups;
+------------------+------------------+------------+---------+
| writer_hostgroup | reader_hostgroup | check_type | comment |
+------------------+------------------+------------+---------+
| 10               | 20               | read_only  | proxy   |
+------------------+------------------+------------+---------+
1 row in set (0.00 sec)
b. Add primary and secondary nodes
insert into mysql_servers(hostgroup_id,hostname,port) values(10,'192.168.30.40',3306);
insert into mysql_servers(hostgroup_id,hostname,port) values(20,'192.168.30.46',3306);
load mysql servers to runtime;
save mysql servers to disk;

### Check status.
ProxySQL>select * from mysql_servers;
+--------------+---------------+------+-----------+--------+--------+-------------+-----------------+---------------------+---------+----------------+---------+
| hostgroup_id | hostname      | port | gtid_port | status | weight | compression | max_connections | max_replication_lag | use_ssl | max_latency_ms | comment |
+--------------+---------------+------+-----------+--------+--------+-------------+-----------------+---------------------+---------+----------------+---------+
| 20           | 192.168.30.40 | 3306 | 0         | ONLINE | 1      | 0           | 1000            | 0                   | 0       | 0              |         |
| 20           | 192.168.30.46 | 3306 | 0         | ONLINE | 1      | 0           | 1000            | 0                   | 0       | 0              |         |
+--------------+---------------+------+-----------+--------+--------+-------------+-----------------+---------------------+---------+----------------+---------+
2 rows in set (0.00 sec)
c. Create a monitoring account for ProxySQL
### Create a monitoring account on the node on which ProxySQL is deployed..
set mysql-monitor_username='monitor';
set mysql-monitor_password='MySQL_123';
load mysql variables to runtime;
save mysql variables to disk;

### Monitor connected users.
ProxySQL>select * from monitor.mysql_server_connect_log;
+---------------+------+------------------+-------------------------+------------------------------------------------------------------------+
| hostname      | port | time_start_us    | connect_success_time_us | connect_error                                                          |
+---------------+------+------------------+-------------------------+------------------------------------------------------------------------+
| 192.168.30.40 | 3306 | 1664183920198998 | 0                       | Access denied for user 'monitor'@'192.168.30.41' (using password: YES) |
| 192.168.30.46 | 3306 | 1664183920926981 | 0                       | Access denied for user 'monitor'@'HAMI02' (using password: YES)        |
| 192.168.30.46 | 3306 | 1664183970671663 | 1616                    | NULL                                                                   |
| 192.168.30.40 | 3306 | 1664183971672625 | 2089                    | NULL                                                                   |
+---------------+------+------------------+-------------------------+------------------------------------------------------------------------+
4 rows in set (0.00 sec)

# Without a monitoring account, it is normal to see that a large number of connection errors (connect_error) are reported. After the monitoring account is configured, the value of connect_error is expected to be NULL.

### Monitor heartbeat information.
ProxySQL>select * from mysql_server_ping_log limit 10;
+---------------+------+------------------+----------------------+------------------------------------------------------------------------+
| hostname      | port | time_start_us    | ping_success_time_us | ping_error                                                             |
+---------------+------+------------------+----------------------+------------------------------------------------------------------------+
| 192.168.30.40 | 3306 | 1664183880229349 | 0                    | Access denied for user 'monitor'@'192.168.30.41' (using password: YES) |
| 192.168.30.46 | 3306 | 1664183880427787 | 0                    | Access denied for user 'monitor'@'HAMI02' (using password: YES)        |
| 192.168.30.40 | 3306 | 1664183890229405 | 0                    | Access denied for user 'monitor'@'192.168.30.41' (using password: YES) |
| 192.168.30.46 | 3306 | 1664183890336793 | 0                    | Access denied for user 'monitor'@'HAMI02' (using password: YES)        |
| 192.168.30.40 | 3306 | 1664183900229529 | 0                    | Access denied for user 'monitor'@'192.168.30.41' (using password: YES) |
| 192.168.30.46 | 3306 | 1664183900357491 | 0                    | Access denied for user 'monitor'@'HAMI02' (using password: YES)        |
| 192.168.30.46 | 3306 | 1664183910229710 | 0                    | Access denied for user 'monitor'@'HAMI02' (using password: YES)        |
| 192.168.30.40 | 3306 | 1664183910406115 | 0                    | Access denied for user 'monitor'@'192.168.30.41' (using password: YES) |
| 192.168.30.46 | 3306 | 1664183920229740 | 0                    | Access denied for user 'monitor'@'HAMI02' (using password: YES)        |
| 192.168.30.40 | 3306 | 1664183920346638 | 0                    | Access denied for user 'monitor'@'192.168.30.41' (using password: YES) |
+---------------+------+------------------+----------------------+------------------------------------------------------------------------+
10 rows in set (0.00 sec)

### Monitor the values of read_only.
ProxySQL>select * from mysql_server_read_only_log limit 10;
+---------------+------+------------------+-----------------+-----------+------------------------------------------------------------------------------------------------------------+
| hostname      | port | time_start_us    | success_time_us | read_only | error                                                                                                      |
+---------------+------+------------------+-----------------+-----------+------------------------------------------------------------------------------------------------------------+
| 192.168.30.46 | 3306 | 1664183876942878 | 0               | NULL      | timeout on creating new connection: Access denied for user 'monitor'@'HAMI02' (using password: YES)        |
| 192.168.30.40 | 3306 | 1664183876961694 | 0               | NULL      | timeout on creating new connection: Access denied for user 'monitor'@'192.168.30.41' (using password: YES) |
| 192.168.30.46 | 3306 | 1664183878441697 | 0               | NULL      | timeout on creating new connection: Access denied for user 'monitor'@'HAMI02' (using password: YES)        |
| 192.168.30.40 | 3306 | 1664183878461063 | 0               | NULL      | timeout on creating new connection: Access denied for user 'monitor'@'192.168.30.41' (using password: YES) |
| 192.168.30.46 | 3306 | 1664183879941587 | 0               | NULL      | timeout on creating new connection: Access denied for user 'monitor'@'HAMI02' (using password: YES)        |
| 192.168.30.40 | 3306 | 1664183879961993 | 0               | NULL      | timeout on creating new connection: Access denied for user 'monitor'@'192.168.30.41' (using password: YES) |
| 192.168.30.46 | 3306 | 1664183881441750 | 0               | NULL      | timeout on creating new connection: Access denied for user 'monitor'@'HAMI02' (using password: YES)        |
| 192.168.30.40 | 3306 | 1664183881461890 | 0               | NULL      | timeout on creating new connection: Access denied for user 'monitor'@'192.168.30.41' (using password: YES) |
| 192.168.30.40 | 3306 | 1664183882942044 | 0               | NULL      | timeout on creating new connection: Access denied for user 'monitor'@'192.168.30.41' (using password: YES) |
| 192.168.30.46 | 3306 | 1664183882958866 | 0               | NULL      | timeout on creating new connection: Access denied for user 'monitor'@'HAMI02' (using password: YES)        |
+---------------+------+------------------+-----------------+-----------+------------------------------------------------------------------------------------------------------------+
10 rows in set (0.00 sec)
The values of read_only are monitored. ProxySQL will move nodes to the corresponding groups based on the values of read_only.
d. Configure the account for external access
insert into mysql_users(username,password,default_hostgroup) values('proxysql','MySQL_123',10);
insert into mysql_users(username,password,default_hostgroup) values('proxysql2','*0815E74A768849A6CCF0E9C1C5B940FB4D9F839E',20);
load mysql users to runtime;
save mysql users to disk;

ProxySQL>select * from mysql_users\G
*************************** 1. row ***************************
              username: proxysql
              password: MySQL_123
                active: 1
               use_ssl: 0
     default_hostgroup: 10
        default_schema: NULL
         schema_locked: 0
transaction_persistent: 1
          fast_forward: 0
               backend: 1
              frontend: 1
       max_connections: 10000
            attributes:
               comment:
*************************** 2. row ***************************
              username: proxysql2
              password: *0815E74A768849A6CCF0E9C1C5B940FB4D9F839E
                active: 1
               use_ssl: 0
     default_hostgroup: 20
        default_schema: NULL
         schema_locked: 0
transaction_persistent: 1
          fast_forward: 0
               backend: 1
              frontend: 1
       max_connections: 10000
            attributes:
               comment:
2 rows in set (0.00 sec)
Description of key parameters in table mysql_users:
| Parameter | Description |
|---|---|
| username | The username used to connect to ProxySQL. |
| password | The password used to connect to ProxySQL. It can be in plaintext or a hash value. To obtain the hash value of your password, run select password('password') on the node and then copy the command output. |
| default_hostgroup | The default routing destination. If proxysql2 is a read-only user, set the value to 20. Then all SQL statements will be routed to the read group, by default. If proxysql2 is not a read-only user, set the value to 10. Then all DML statements will be routed to the write group, and query statements will be routed to both the read and write groups. |
5.6 Configure the read/write splitting policy
ProxySQL supports flexible routing rules which can be specified at the user level and the database level. We recommend that you configure rules to route aggregate queries, ad hoc queries, and complex queries to StoneDB, because StoneDB is suitable for online analytical processing (OLAP). The following example provides some simple routing rules for your reference.
Tables related to routing rules are mysql_query_rules and mysql_query_rules_fast_routing. mysql_query_rules_fast_routing is an extention of mysql_query_rules and is used to evaluate fast routing policies and attributes (available only if the ProxySQL version is higher than 1.4.7).
Description of key parameters in table mysql_query_rules:
| Parameter | Description |
|---|---|
| active | Specifies whether to enable this rule. Possible values: - 1: yes - 0: no |
| match_pattern | Defines the rule. |
| destination_hostgroup | Specifies the default group. |
| apply | Specifies whether to apply the rule. Possible values: - 1: yes - 0: no |
### Create rules
### The following example creates two rules:
### 1. Assign all statements starting with SELECT to the read group (group ID: 20).
### 2. Assign SELECT ... FOR UPDATE statements to the write group (group ID: 10). All the other DML statements will be routed to the write group, by default.
insert into mysql_query_rules(rule_id,active,match_pattern,destination_hostgroup,apply) values(1,1,'^select.*for update$',10,1);
insert into mysql_query_rules(rule_id,active,match_pattern,destination_hostgroup,apply) values(2,1,'^select',20,1);
insert into mysql_query_rules(rule_id,active,match_pattern,destination_hostgroup,apply) values(3,1,'^select*sum',20,1);
load mysql query rules to runtime;
save mysql query rules to disk;

### Check rules.
ProxySQL>select * from mysql_query_rules\G
*************************** 1. row ***************************
              rule_id: 1
               active: 1
             username: NULL
           schemaname: NULL
               flagIN: 0
          client_addr: NULL
           proxy_addr: NULL
           proxy_port: NULL
               digest: NULL
         match_digest: NULL
        match_pattern: ^select.*for update$
 negate_match_pattern: 0
         re_modifiers: CASELESS
              flagOUT: NULL
      replace_pattern: NULL
destination_hostgroup: 10
            cache_ttl: NULL
   cache_empty_result: NULL
        cache_timeout: NULL
            reconnect: NULL
              timeout: NULL
              retries: NULL
                delay: NULL
    next_query_flagIN: NULL
       mirror_flagOUT: NULL
     mirror_hostgroup: NULL
            error_msg: NULL
               OK_msg: NULL
          sticky_conn: NULL
            multiplex: NULL
  gtid_from_hostgroup: NULL
                  log: NULL
                apply: 1
           attributes:
              comment: NULL
*************************** 2. row ***************************
              rule_id: 2
               active: 1
             username: NULL
           schemaname: NULL
               flagIN: 0
          client_addr: NULL
           proxy_addr: NULL
           proxy_port: NULL
               digest: NULL
         match_digest: NULL
        match_pattern: ^select
 negate_match_pattern: 0
         re_modifiers: CASELESS
              flagOUT: NULL
      replace_pattern: NULL
destination_hostgroup: 20
            cache_ttl: NULL
   cache_empty_result: NULL
        cache_timeout: NULL
            reconnect: NULL
              timeout: NULL
              retries: NULL
                delay: NULL
    next_query_flagIN: NULL
       mirror_flagOUT: NULL
     mirror_hostgroup: NULL
            error_msg: NULL
               OK_msg: NULL
          sticky_conn: NULL
            multiplex: NULL
  gtid_from_hostgroup: NULL
                  log: NULL
                apply: 1
           attributes:
              comment: NULL
*************************** 3. row ***************************
              rule_id: 3
               active: 1
             username: NULL
           schemaname: NULL
               flagIN: 0
          client_addr: NULL
           proxy_addr: NULL
           proxy_port: NULL
               digest: NULL
         match_digest: NULL
        match_pattern: ^select*sum
 negate_match_pattern: 0
         re_modifiers: CASELESS
              flagOUT: NULL
      replace_pattern: NULL
destination_hostgroup: 20
            cache_ttl: NULL
   cache_empty_result: NULL
        cache_timeout: NULL
            reconnect: NULL
              timeout: NULL
              retries: NULL
                delay: NULL
    next_query_flagIN: NULL
       mirror_flagOUT: NULL
     mirror_hostgroup: NULL
            error_msg: NULL
               OK_msg: NULL
          sticky_conn: NULL
            multiplex: NULL
  gtid_from_hostgroup: NULL
                  log: NULL
                apply: 1
           attributes:
              comment: NULL
3 rows in set (0.00 sec)
The value of **rule_id **in the SELECT ... FOR UPDATE statement must be smaller than that in the common SELECT statement. This is because ProxySQL matches each statement with the rules in the sequence of rule_id.
5.7 Check whether read/write splitting is successfully configured
a. Perform a read operation
# mysql -uproxysql -pMySQL_123 -h127.0.0.1 -P6033
mysql: [Warning] Using a password on the command line interface can be insecure.
Welcome to the MySQL monitor.  Commands end with ; or \g.
Your MySQL connection id is 6
Server version: 5.5.30 (ProxySQL)

Copyright (c) 2000, 2021, Oracle and/or its affiliates.

Oracle is a registered trademark of Oracle Corporation and/or its
affiliates. Other names may be trademarks of their respective
owners.

Type 'help;' or '\h' for help. Type '\c' to clear the current input statement.

proxysql@HAMI02 17:21:  [(none)]> select sum(money) from aa.ttt;
+------------+
| sum(money) |
+------------+
|    88888.8 |
+------------+
1 row in set (0.01 sec)

proxysql@HAMI02 17:21:  [(none)]> select @@server_id;
+-------------+
| @@server_id |
+-------------+
|          46 |
+-------------+
1 row in set (0.00 sec)
b. Perform a write operation
# mysql -uproxysql -pMySQL_123 -h127.0.0.1 -P6033
mysql: [Warning] Using a password on the command line interface can be insecure.
Welcome to the MySQL monitor.  Commands end with ; or \g.
Your MySQL connection id is 19
Server version: 5.5.30 (ProxySQL)

Copyright (c) 2000, 2021, Oracle and/or its affiliates.

Oracle is a registered trademark of Oracle Corporation and/or its
affiliates. Other names may be trademarks of their respective
owners.

Type 'help;' or '\h' for help. Type '\c' to clear the current input statement.

proxysql@HAMI02 19:53:  [(none)]> begin;
Query OK, 0 rows affected (0.00 sec)

proxysql@HAMI02 19:54:  [(none)]> insert into aa.t1 values(7);
Query OK, 1 row affected (0.00 sec)

proxysql@HAMI02 19:54:  [(none)]> select @@server_id;
+-------------+
| @@server_id |
+-------------+
|          40 |
+-------------+
1 row in set (0.00 sec)
More information
- We recommend that you enable the GTID mode. In this way, the system can automatically start the replication thread if the secondary node fails, without the need to locate the position in the binlog.
- If the number of worker threads on the secondary node 1 is the same as that on the secondary node 2, secondary node 2 will consume more CPU resources.
- If data latency between the primary node and secondary node 2 (on which StoneDB deployed) is high, you can set tianmu_enable_rowstore to off. After all data in the primary node is synchronized to secondary node 2, set the parameter to on. However, if StoneDB is restarted when this parameter is set to off, data loss may occur after StoneDB is restarted.
- We recommend that you configure routing rules to route aggregate queries, ad hoc queries, and complex queries to StoneDB.